Python中利用seqeval模块进行序列标注算法的模型评估

0. 概述

在NLP任务中,我们经常需要使用序列标注算法,为此,我们需要评估该模型在序列标注任务中的效果,这里使用了seqeval模块。

一般而言,序列标注算法的格式有BIO、IOBES、BMES等。

模型的评价指标有,一般只会注意英文,中文容易弄混:

1
2
3
真实值\预测值   |Positive       |Negative       |
Positive |True Positive |False Negative |
Negative |False Positive |True Negative |

Precision = TP/(TP+FP)
预测为正的样本中有多少预测对了

Recall = TP/(TP+FN)
真实为正的样本中有多少预测对了

Accuracy = (TP+TN)/(TP+TN+FP+FN)

F1 Score = 1/2(1/recall + 1/precision)
= 2Recall*Precision/(Recall+Precision)

1.样例

参考官网资料

1
2
3
4
5
6
7
8
9
from seqeval.metrics import accuracy_score,classification_report,f1_score

y_true = [['O', 'O', 'O', 'B-MISC', 'I-MISC', 'I-MISC', 'O'], ['B- PER', 'I-PER', 'O']]

y_pred = [['O', 'O', 'B-MISC', 'I-MISC', 'I-MISC', 'I-MISC', 'O'],['B-PER', 'I-PER', 'O']]

print(f1_score(y_true, y_pred))

print(classification_report(y_true, y_pred))

Python之版本相争

在Ubuntu 20 版本的时候,不支持直接下载python2的pip ,所以,有下面的解决方法

  1. Start by enabling the universe repository:

    1
    sudo add-apt-repository universe
  2. Update the packages index and install Python 2:

    1
    2
    sudo apt update
    sudo apt install python2
  3. Use curl to download the get-pip.py script:

    1
    curl https://bootstrap.pypa.io/get-pip.py --output get-pip.py
  4. Once the repository is enabled, run the script as sudo user with python2 to install pip :

    1
    sudo python2 get-pip.py
  5. Verify the installation

    1
    pip2 --version

LSTM分析

关于LSTM模型:

参考:https://colah.github.io/posts/2015-08-Understanding-LSTMs/

细胞状态是LSTM的核心,如下图所示。

细胞状态就像是传送带,在整个链条中一直延伸,只有一些小的线性作用,有利于信息不加改变地流动。

LSTM模型通过门结构调节,具有向细胞状态删除或者增加信息的能力。

有三个门结构,来保护控制细胞状态。

forget gate layer

我们首先需要确定之前的信息需要忘记多少
取决于h_t-1和x_t,输出0到1之间的数字。
1表示完全保留之前的信息C_t-1,0表示完全忘记之前的信息

input gate layer

然后,我们需要决定当前细胞状态需要加入多少新的信息。
这里有两个部分,第一个是sigmoid函数,叫做输入门层,决定了我们更新的系数i。然后一个tanh函数建立了一个候选的数值Ct,在下一步中,我们将会将这两个合并去更新状态。

更新旧的状态Ct-1

这样,看上面的公式就很简单,首先是对之前的状态乘以一个系数,忘记一些信息,然后增加当前的状态乘以一个系数,记住一些当前的信息。

最后,我们应该决定一个节点的输出结果了。这个就诶过取决于我们的细胞状态,但是是过滤后的版本。

我们先使用sigmoid层得到的我们应该输出的东西,然后哦将细胞状态通过tanh得到系数,将两个相乘,得到当前的状态h_t

LSTM有多个变种,这里就跳过。

其中比较重要的是BiLSTM,就是两个方向的LSTM的输出状态拼接到一起:

最后补充一下,在写代码的时候,使用的torch.nn.LSTM的官方资料说明:

下面是参数的说明:

1
2
3
4
5
6
7
8
9
10
11
12
13
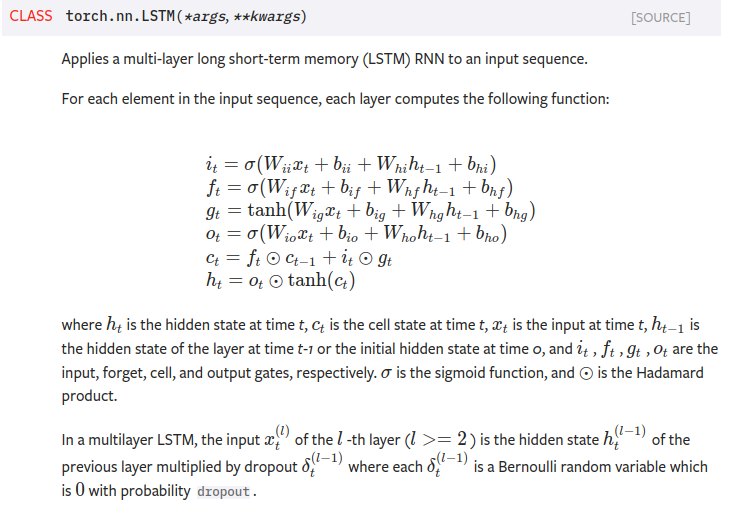
input_size – The number of expected features in the input x

hidden_size – The number of features in the hidden state h

num_layers – Number of recurrent layers. E.g., setting num_layers=2 would mean stacking two LSTMs together to form a stacked LSTM, with the second LSTM taking in outputs of the first LSTM and computing the final results. Default: 1

bias – If False, then the layer does not use bias weights b_ih and b_hh. Default: True

batch_first – If True, then the input and output tensors are provided as (batch, seq, feature). Default: False

dropout – If non-zero, introduces a Dropout layer on the outputs of each LSTM layer except the last layer, with dropout probability equal to dropout. Default: 0

bidirectional – If True, becomes a bidirectional LSTM. Default: False

spo抽取知识图谱

参考:
https://github.com/percent4/spo_extract_platform

知识图谱的构建由两个部分构成:
1.SPO三元组抽取:序列标注算法(ALBERT+BiLSTM+CRF)
SPO:Subject(主语) Predicate(谓语) Object(宾语)
sequence_labeling F1:81%

2.关系抽取:文本二分类(ALBERT+BiGRU+ATT)
text_classification F1:96%

提取无结构文本的应用在extract_example
下面会对这两个部分分别做完整的介绍:

1.SPO三元组


上面是模型的框架

1.ALBERT层

albert是以单个汉字作为输入的(本次配置最大为128个,短句做padding),两边分别加上开始标识CLS和结束标识SEP,输出的是每个输入word的embedding。在该框架中其实主要就是利用了预训练模型albert的词嵌入功能,在此基础上fine-tuning其后面的连接参数,也就是albert内部的训练参数不参与训练。

2.BiLSTM层

该层的输入是albert的embedding输出,一般中间会加个project_layer,保证其输出是[batch_szie,num_steps, num_tags]。batch_size为模型当中batch的大小,num_steps为输入句子的长度,本次配置为最大128,num_tags为序列标注的个数,如图中的序列标注一共是5个,也就是会输出每个词在5个tag上的分数,由于没有做softmax归一化,所以不能称之为概率值。

3.CRF层

如果没有CRF层,直接按BiLSTM每个词在5个tag的最大分数作为输出的话,可能会出现【B-Person,O,I-Person,O,I-Location】这种序列,显然不符合实际情况。CRF层可以加入一些约束条件,从而保证最终预测结果是有效的。

例如:
句子的开头应该是“B-”或“O”,而不是“I-”。

2.关系抽取

Ubuntu之GPU运算不归路

之前,本人尝试在Ubuntu系统上进行GPU运算,装GPU驱动等等。
以失败告终,最后,在命令行模式下转移了自己的部分资料,然后重装了系统。
面对这个惨痛的教训,我怎么能够忍气吞声,开始筹备第二次GPU远征。

这次,我先保存资料,以供后人借鉴。

首先,检查电脑上的GPU信息:

1
2
3
4
5
lspci | grep -i nvidia #可以查询所有的nvidia显卡

lspci -v -s [显卡编号] #可以查询显卡的具体属性

nvidia-smi #可以查看显卡的显存利用率,特别注意,这个需要下载驱动,没有下载驱动的,请小心,上次我就下载驱动之后就出问题了

PyTorch使用说明

参考资料:
https://pytorch.org/tutorials/beginner/deep_learning_60min_blitz.html

第一部分 tensor + operator

第二部分 autograd
torch.Tnesor是包中的核心类,
.requires_grad = True,那么会自动跟踪所有运算,
.backward() 当你结束运算调用这个函数,就会自动计算梯度。
.grad 梯度会计算放到这里

.detach() 可以停止跟踪
with torch.no_grad(): 停止跟踪
上面的在评估模型的时候非常有用

Function类也是一个很重要的类别。
.grad_fn 是一个tensor被一个函数建立

随机数初始化:
在神经网络中,参数默认是进行随机初始化的,不同的初始化参数往往会导致不同的结果,当得到比较好的结果的时候,我们希望结果可以复现,在torch中,通过设置随机数种子可以达到这个目的:

1
2
3
4
5
6
7
8
9
10
11
def set_seed(seed):
torch.manual_seed(seed)
# cpu 为CPU设置种子用于生成随机数,以使得结果是确定的
torch.cuda.manual_seed(seed)
# gpu 为当前GPU设置随机种子
torch.backends.cudnn.deterministic = True
# cudnn 每次返回的卷积算法都是确定的,即默认算法
np.random.seed(seed)
# numpy
random.seed(seed)
# random and transforms

在程序的入口处设置随机数种子

1
set_seed(1)

1.当我们训练了一个模型之后,需要将训练得到的模型进行保存。

1
2
PATH = './cifar_net.pth'
torch.save(net.state_dict(),PATH)

2.测试网络

1
2
3
# 重新加载保存的模型
net = Net()
net.load_state_dict(torch.load(PATH))

保存模型的方式不同。会导致模型有可能不同

1
2
3
4
5
6
7
8
9
10
11
12
13
14
15
16
17
18
19
20
21
22
# 保存模型
torch.save(net,'./model.pth')
torch.save(net.state_dict(),'./model-dict.pth')

# 加载模型
net=torch.load('./model.pth')
net.load_state_dict(torch.load('./model-dict.pth'))

# 为了加载之后相同,需要指定eval模式
#保存
net=net.eval()
torch.save(net,'./model.pth')
torch.save(net.state_dict(),'./model-dict.pth')

#加载
net_load1=torch.load('./model.pth')
net_load1=net_load1.eval()

#或者
net_load2.load_state_dict(torch.load('./model-dict.pth'))
net_load2=net_load2.eval()

model.state_dict()是浅拷贝,返回的参数依然会随着网络的训练而变化,需要deepcopy或者拷贝到硬盘中。

在state_dict中有下面四个内容:
1._paramters
nn.parameter.Paramter,也就是组成Module的参数。例如一个nn.Linear通常由weight和bias参数组成。它的特点是默认requires_grad=True,也就是说训练过程中需要反向传播的
2._buffers
不需要参与反向传播的参数
3._modules
torch.nn.Module类,你定义的所有网络结构都必须继承这个类。
4._state_dict_hooks
最后一种就是在读取state_dict时希望执行的操作,一般为空,所以不做考虑。

关于NLLLoss的代码说明:

1
2
3
4
5
6
7
8
9
10
11
12
13
14
15
16
17
18
19
import torch
import torch.nn as nn
import torch.nn.functional as F

torch.manual_seed(2019)

output = torch.randn(1, 3) # 网络输出
target = torch.ones(1, dtype=torch.long).random_(3) # 真实标签
print(output)
print(target)

# 直接调用
loss = F.nll_loss(output, target)
print(loss)

# 实例化类
criterion = nn.NLLLoss()
loss = criterion(output, target)
print(loss)

计算公式:loss(input, class) = -input[class]
公式理解:input = [-0.1187, 0.2110, 0.7463],target = [1],那么 loss = -0.2110
个人理解:感觉像是把 target 转换成 one-hot 编码,然后与 input 点乘得到的结果

如果 input 维度为 M x N,那么 loss 默认取 M 个 loss 的平均值,reduction=’none’ 表示显示全部 loss

1
2
3
4
5
6
7
8
9
10
11
12
13
14
15
16
17
18
19
20
21
22
23
24
25
26
27
import torch
import torch.nn as nn
import torch.nn.functional as F

torch.manual_seed(2019)

output = torch.randn(2, 3) # 网路输出
target = torch.ones(2, dtype=torch.long).random_(3) # 真实标签
print(output)
print(target)

# 直接调用
loss = F.nll_loss(output, target)
print(loss)

# 实例化类
criterion = nn.NLLLoss(reduction='none')
loss = criterion(output, target)
print(loss)

"""
tensor([[-0.1187, 0.2110, 0.7463],
[-0.6136, -0.1186, 1.5565]])
tensor([2, 0])
tensor(-0.0664)
tensor([-0.7463, 0.6136])
"""

那么CrossEntropyLoss和NLLLoss区别在于
CrossEntropyLoss = Softmax+Log+NLLLoss

还有
ignore_index 就是计算的时候忽略的标签的数值

梯度计算以及backward方法

tensor在torch中是一个n维数组,我们通过指定参数requires_grad = True来建立一个反向传播图,从而可以计算梯度。被称之为动态计算图Dynamic Computation Graph。

1
2
3
4
5
6
7
8
9
10
11
12
13
14
15
16
17
import torch
import numpy as np

# solution 1
x = torch.randn(2,2,requires_grad=True)

# solution 2
x = torch.autograd.Variable(torch.Tensor([2,3]),requires_grad=True)

# solution 3
x = torch.tensor([2,3],requires_grad=True,dtype=torch.float64)

# solution 4
x = np.array([1,2,3],dtype=np.float64)
x = torch.from_numpy(x)
x.requires_grad = True
# or x.requires_grad(Ture)

attention:
1.只有浮点型数据才有梯度,

tensor是PyTorch中的组建,Variable是对tensor的封装,操作和tensor一样,但是每个variable都有三个属性,包含了

1
2
3
.data 数据
.grad 梯度
.grad_fn 变量的得到方式

Python模块打包及发布

概述:
如何将自己开发的库分享给别人使用,使用pip install安装。
本文章包含制作python安装包和发布。
并且,通过这个步骤,我可深入了解各个模块中的内容,方便自己使用别人的库

参考资料:
https://packaging.python.org/tutorials/packaging-projects/

1.创建setup.py文件

建立如下所示的文档结构

1
2
3
4
5
6
7
├── example_pkg # packet 文件
│   ├── __init__.py # 全局变量定义等,可以直接是空文件,定位
│   └── test_pkg.py
├── LICENSE # 许可证
├── README.md # 描述文件
├── setup.py # 配置文件
└── tests # 测试文件夹

其中setup.py文件里面需要设置packet的配置,里面有注释:

1
2
3
4
5
6
7
8
9
10
11
12
13
14
15
16
17
18
19
20
21
22
import setuptools

with open("README.md","r") as fh:
long_description = fh.read()

setuptools.setup(
name = "Emir-Liu-packet", #distribution name of package
version = "0.0.1",
author = "Emir-Liu",
author_email = "egliuym@gmail.com",
description = "my first test packet", # a short,one-sentence summary
long_description = long_description, # the long description is loaded from README.md
long_description_content_type = "text/markdown",
url = "https://emir-liu.github.io/", # URL of the homepage of the project
packages = setuptools.find_packages(), # a list of all python import packages that should be included in the destribution package
classifiers = [
"Programming Language :: Python :: 3",
"License :: OSI Approved :: MIT License",
"Operating System :: OS Independent",
], # some additional metadata about package ,at least license ,operating system and verson of python
python_requires = '>=3.0',
)

2.打包文件

1
2
python3 -m pip install --user --upgrade setuptools wheel
python3 setup.py sdist bdist_wheel

注意打包文件里面不写程序是没有输出的,打包之后应该会有文件夹(dist中包含.whl和.tar.gz文件),之后上传这个文件夹

3.注册Pypi,然后上传

先注册pypi,邮箱激活

然后,在~/.pypirc中写入:

1
2
3
4
5
6
7
8
9
10
11
12
[distutils]
index-servers =
pypi
testpypi

[testpypi]
repository = https://test.pypi.org/legacy/

[pypi]
repository = https://upload.pypi.org/legacy/
username = xxx
password = xxx

这一步只要一开始弄好就不用输入密码什么的了。

上传:
twine upload dist/*

之后你可以在网站上看到你的包了。